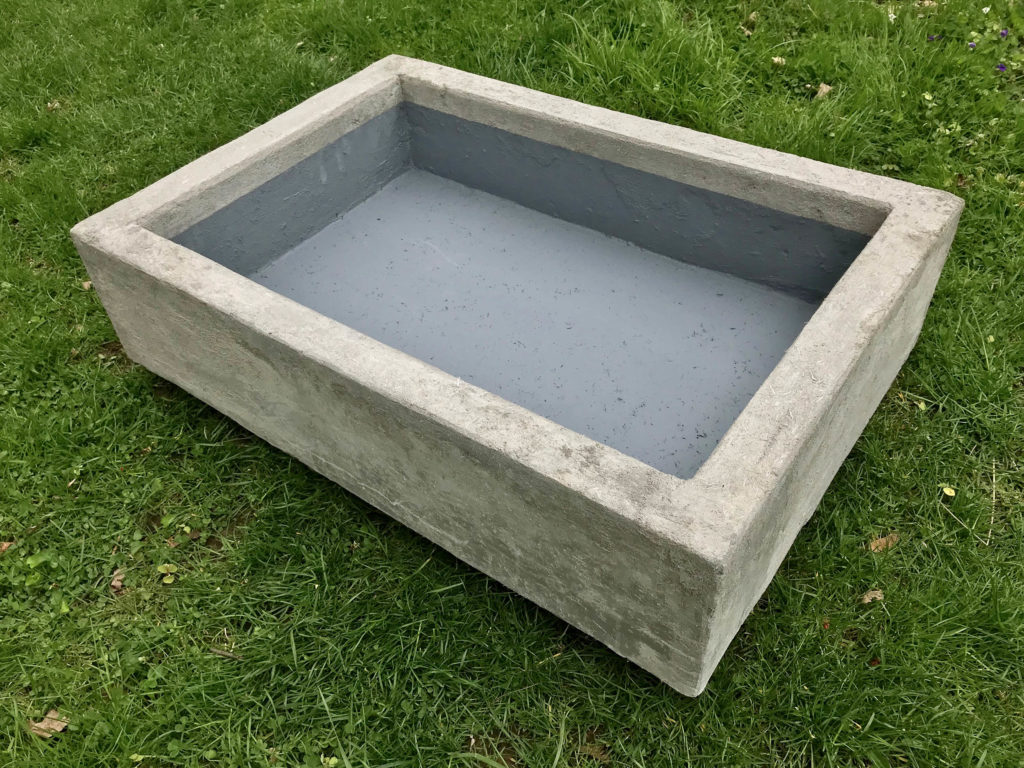
Concrete planter basin designed for an open terrarium planting. This enclosure is an approximate Golden Rectangle with walls 2.5″ (6cm) thick and measuring 31″ (79cm) X 19.5″ (50cm) X 7″ (18cm) on the inside. Note that the darker grey masonry waterproofer was applied to the inside of the basin, leaving about 1.5″ (4cm) of bare concrete below the top ledge.
Design of aquariums, terrariums and other model ecosystem displays begins with enclosure selection. The length, width, and height of the enclosure constrains the choices for hardscape, livestock and plants, while also guiding filtration, illumination and temperature control. Tank builders use a few different materials, including vinyl sheet and clear acrylic sheet, but glass is the standard for terrarium and aquarium construction. Glass panels can provide excellent clarity and strength. A builder can put them together in a nearly infinite range of sizes and shapes. A well-made tank with options like rimless construction and beveled glass edges functions as an integral part of the design aesthetic.
Nevertheless, it may be advantageous to “think outside the box” and ponder other enclosure materials, methods, and design options. While glass is a tough material, its surface conspicuously shows damage, such as scratches or the etched haze, that can develop with hard water deposits or water condensation. The edges of a glass panel are also vulnerable to chipping, so glass is a poor choice option for situating close to a floor, such as for an indoor pond, where it may be struck by furniture, footwear or cleaning equipment. The standard kind of tank that bounds the display above, below and along the sides offers clear advantages for keeping aquarium or vivarium plants and animals inside, framing the layout composition and controlling environmental parameters, but looser boundaries can provide new creative options. A few enterprising aquarists have built dramatic riparium plantings with low and broad glass tanks; the riparium foliage grows into the space above the enclosure, softening the boundaries with the model ecosystem and the interior room space. The Keiryu Company (Japan) has shared videos to show their captivating work with planted recreations of flowing mountain streams in shallow basins.
A Glass Alternative
While developing an idea for a plant-only, open terrarium style planting, I found that I needed a durable alternative to glass box construction. I was drawn to the idea of a stone or replica stone trough of the kind used for diminutive rock garden alpine plants, but my project for indoor growing required an enclosure that would be totally waterproof as well as light in weight for portability. Rock garden enthusiasts usually build troughs with hypertufa, a DIY blend with Portland cement, sphagnum peat, and perlite that yields a convincing stone-like surface texture. Hypertufa is porous, advantageous for root health in an outdoor planting, but unacceptable for an indoor setting on a hardwood floor. While the peat and perlite content of hypertufa creates voids to lighten the concrete material, a good-sized hypertufa trough with thick walls will still weigh a couple of hundred pounds or more.
There’s more than one way to skin an aquarium cabinet, but the solution I settled on was to build the basin with a concrete blend formulated for thin application over a core of extruded polystyrene insulation. An inside coating of acrylic masonry sealant added an extra measure of waterproofing. In addition to shallow, open style terrariums, this concrete planter basin could serve well for an indoor carnivorous plant bog, indoor pond or open paludarium planting. I have also sketched an idea for a planting inspired by tsuboniwa Japanese courtyard gardens but illuminated with artificial light.
Supplies, Tools & Materials
This project requires no power tools or other special equipment. You can acquire all of the supplies and materials at a moderate cost from any big box home improvement store. The materials are not especially hazardous, although care should be taken to avoid respiration of concrete dust and fumes from the glue adhesive and acrylic masonry sealant. Make sure to review the Material Safety Data Sheet (MSDS) for each of these. This project will make a mess. Do the work in a well-ventilated area, preferably outdoors.
Basin supplies & materials
- Pink extruded insulation foam sheet
- Surface-bonding cement – Quikrete® formulation is a good choice.
- Acrylic bonding additive – I used Akona® Concrete Bonding Additive brand with good results.
- Fiberglass drywall joint tape and/or window screen
- Gorilla Glue® adhesive
- Acrylic-based Masonry Waterproofer – I used Zinsser® DRYGARD™ for my latest project. I’ve also had good results with DRYLOK® brand waterproofer. Take care to select a product containing no mold or mildew inhibitors as these may harm livestock and plants. Masonry waterproofer can be tinted for darker grey colors or other earthtones.
- Masking tape
Tools
- 5-gallon pail or similar container – for mixing concrete.
- Snap-blade cutter with fresh blades
- Measuring tape or yardstick
- Straight edge – for marking and making foam sheet cuts. The straight edge should have a thickness of about .75″ ( cm) to guide straight vertical cuts. A straight 1X4 pine board can work well.
- Plastic cup or dish – for measuring concrete mix and water.
- Masonry trowel – for mixing and applying concrete.
- Paintbrush
- Plastic sheet
- Water mist spray bottle
- Propane torch
Personal safety
- Chemical respirator with fresh carbon filters
- Rubber gloves
- Eye protection
Build Steps
Design
Develop a concept for a concrete planter basin size and shape to match your project. A basin for an indoor pond will need to accommodate the water depth with an additional inch or two above the water level. An open terrarium or carnivorous plant bog will need to hold soil substrate while also leaving space below for a drainage layer or false bottom. When determining dimensions, keep in mind that the concrete skin will add about 3/8″ (9cm) to every surface where it is applied. The following lists a few ideas for basin shapes and plantings:
- Golden rectangle – multiply the desired length by .62 to determine the (front-to-back) width for a serene golden rectangle shape.
- Square – like a cube aquarium, the simple geometry of a square basin can provide visual depth and a pleasing view from every angle.
- Linear – arrange plants such as Sarracenia in two dimensions to showcase their unique forms in negative space.
Building the Foam Core
The illusion of heft and mass is accentuated with thicker basin walls, so I double-up two pieces of 1.5″ (3.8 cm) or 2″ (5.1 cm) foam sheet for each side to create walls that are several inches thick. The basin core will thus be constructed with ten foam sheet pieces. A smaller basin may be constructed with single sheet thicknesses and thus require only five rectangular pieces. So that all pieces assemble with snug joints, make the cuts straight and square. Push out most of the snap-blade cutter blade and press it flat against the straight edge vertical surface for 90° cuts.
Gorilla Glue is the preferred adhesive because it has a quick bonding time and can cure without very much air contact. Surrounded on both sides by closed-cell foam, PVA white glue, on the other hand, would take days or weeks to dry. Bond the pairs of foam sheet for each panel with a thin application of Gorilla Glue. Water triggers the Gorilla Glue curing process, so mist each surface after applying the glue and before joining. Gorilla Glue expands as a hard foam while it cures, so apply weight—water-filled jugs work well for this—to keep the pieces from pushing very far apart. A careful, even application of Gorilla Glue to the joints will provide some extra waterproofing for the completed basin. Use masking tape to clamp when assembling the five pieces and watch out for excessive glue expansion, which can distort the joints.
After the foam core is fully assembled, use the snap-blade cutter to cut thin strips of foam for a 1/4″ (6mm) bevel around every outside edge. Removing this material will leave space for beveled wet concrete edges during the final finishing steps.
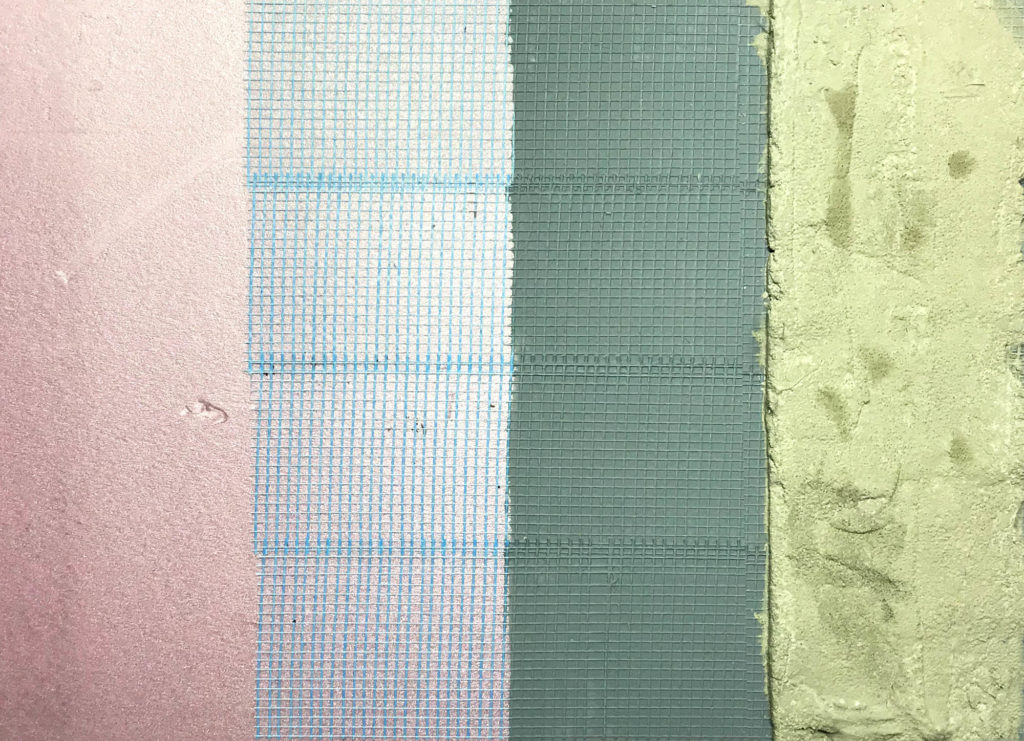
Basin construction layers, from left: pink extruded polystyrene foam, adhesive fiberglass tape, latex masonry waterproofer, surface bonding cement. As final finishing steps, additional layers of masonry waterproofer are applied on top of the cement around the basin inside surfaces.
Waterproofing and Reinforcement
Like the calcium phosphate content of bones, or the fiberglass in a boat hull, the screen applied to the foam core will enhance strength and rigidity for the concrete basin. With a coating of the masonry waterproofer, it will also roughen the surface texture for much better adhesion of the surface bonding cement. Cover the whole foam core with a tight layer fiberglass drywall tape and/or window screen. Drywall tape is sticky on one side, but the window screen will need staples and/or glue—cyanoacrylate “Krazy Glue” works well—to hold tight.
Paint every foam insulation surface with masonry waterproofer. For extra waterproofing, carefully apply a second coat to the inside of the basin. This is the most critical waterproofing layer, so make sure that it soaks in to fill all corners and gaps. Wet masonry waterproofer is water-soluble, so your brush will easily clean up with plain water. Give the masonry waterproofer a few days to dry before applying the surface bonding cement.

One-gallon (3.8 liter) can of Zinsser® DRYGARD™. This particular formulation was selected among a few different options as a waterproofer paint without added mold or mildew inhibitors.
Surface Bonding Cement Application
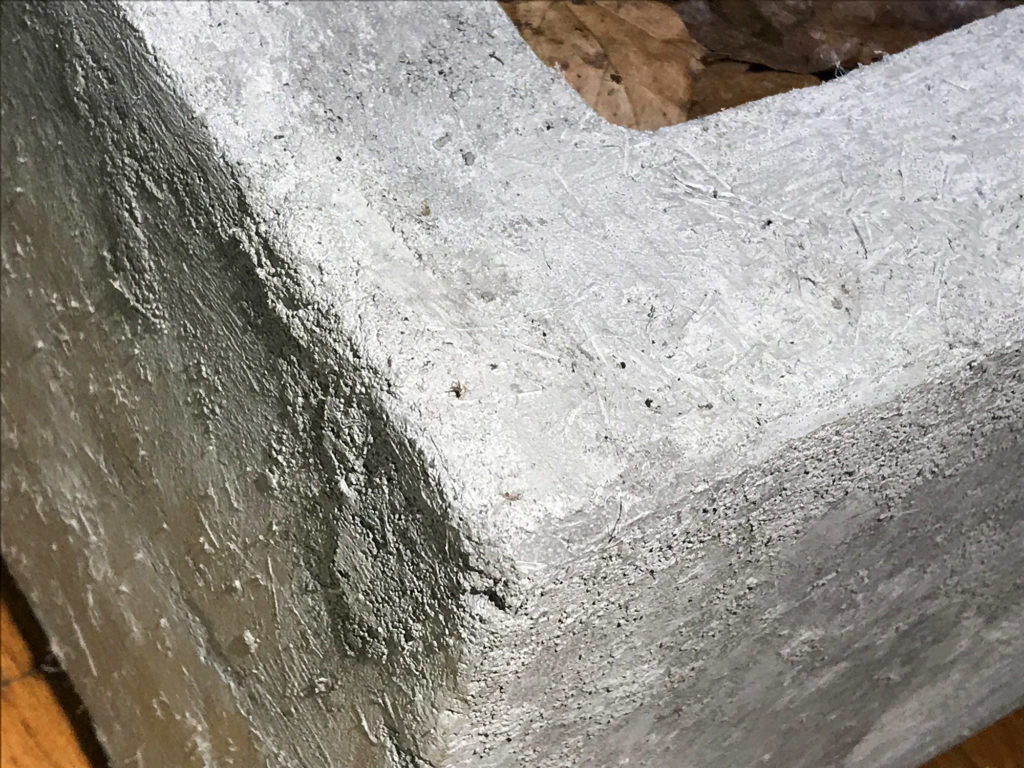
Concrete basin edges and corner detail. Every outside edge was formed in the wet cement mix with a rough 45° angle. The corners of the foam core were likewise beveled with the snap-blade cutter to leave space for this final finishing step.
Surface bonding cement is formulated with plastic fibers for strength as a thin layer and it is most often used as a patch for damaged stucco. While it can be applied vertically, it is easier to work with on a flat horizontal surface, so finishing the whole concrete basin may require several applications. Acrylic bonding additive will improve the cement adhesion and hardness, but concrete with bonding additive can apparently degrade after long-term contact with water. Therefore, I added it to the cement mix only for the basin outside and ledge top surfaces. I mixed the cement for the basin inside with plain water.
Follow the cement package directions for mixing. You might find a need to slightly modify the blend for the right consistency, so make sure to keep some extra dry cement mix at hand. I have had good results with one part acrylic bonding additive combined with two parts water for mixing. Straight bonding additive will also work, but it can result in a shiny concrete surface.
Troweling the wet cement is awkward. The mix is clumpy and the plastic fibers impede even smoothing, but with practice, you will figure it out. I applied the mix in a layer about .375″ (1cm) over the basin side, top and inside bottom surfaces. To cut down on weight, I left the outside bottom surface with its screen and masonry waterproof surface. Bevel the edges as you finish applying wet mix to each side. A square, sharp concrete edge will damage more easily and could also scrape skin.
Surface Bonding Cement Final Steps
Concrete reaches its strongest cured state when it remains evenly moist during an extended curing period, so keep the basin surfaces moist while you work and for at least three days after the final cement application. Spray clean water over the basin and use the plastic sheet cover to maintain humidity.
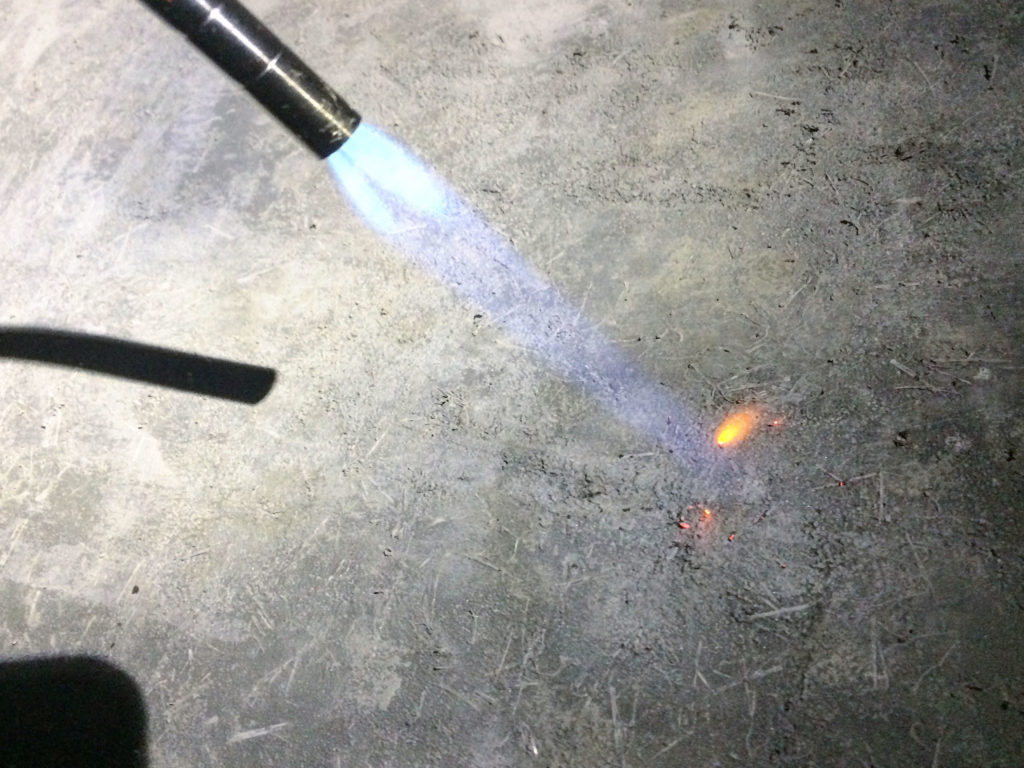
Give the basin a couple more days to air dry after the humid curing period. The plastic fibers in the cement mix will probably poke out of the sides of the basin in many places. Burn these away with a propane hand torch, taking care to not overheat the cement surfaces.
Final Waterproofing Coat
Paint the basin’s inside concrete surfaces with a final application of masonry waterproofer. I used two coats of waterproofer here, allowing a couple of days to dry between coats and a full week afterward for thorough drying. While serving as a final waterproofing layer, masonry waterproofer on the inside of the basin will also protect the soil substrate layers and/or water inside from a pH swing that would otherwise be caused by contact with bare concrete. I have found some conflicting information about the durability of masonry waterproofer as a sealant in direct contact with water, but online manufacturer data sheets describe both DRYLOK® and Zinsser® DRYGARD™ as sealants for the inside surfaces of concrete birdbaths, concrete ponds, and similar vessels.
Conclusions
While it has come to symbolize the destruction of nature with the advance of human settlement, concrete can also express much of the character of natural stone, as well as the hand of the craftsperson. A concrete enclosure may thus harmonize very well with your interior decor and a planted model ecosystem or similar project. This project description offers just one solution for building an adaptable, low cost and durable enclosure with concrete and other materials. By spending some time researching, looking at pictures, drawing sketches and “thinking outside the box,” you can find many more unique DIY approaches for your living art planted displays.

Concrete planter basin with woodland scene open terrarium planting. The ceiling canopy above supports the natural maple poles, while also organizing electrical connections, lighting and sound system. The trees will to fill more of the vertical dimension, but it will be important to maintain some of the open space for the woodland understory effect.






Devin,
Could this method be used to make a fish pond, say something 8 feet long, 3 feet wide and 2 feet deep ? Maybe some additional bracing ?
Thanks for reading! You could probably build something that size with some of these materials, but I would try to get some input from somebody qualified in concrete construction. Even with a foam core, a concrete-coated basin with those dimensions will be pretty heavy. Do you need the pond to be portable? If it’s going to be sited in just one spot, I think I would just pour the whole thing in solid concrete.
I’m no expert and I’m trying to learn how to DIY for a modern looking fountain where the basin will look exactly like the one you provide here in your tutorial. It’s perfect! I just want to make this type of basin and then have a water pump shooting up a small spring in the center about 14″ in the air. This will be for looks and the relaxing sound of the water splashing.
Getting back to your concern, I am inclined to agree with you. I think making a pond for something this big would be best made out of solid concrete. With your dimensions of your basin that’s going to be approximately 40 gallons of water. That means the pressure and weight of the water is over 330lb. Of course it could be less if you don’t fill it up completely. But that’s constant pressure on the sides and seams of a foam based planter/basin with a thin concrete layer painted over the surface. I don’t think it would hold up in the long run.
Your DIY turned out beautifully, by the way.
Wow very cool. Feeling inspired to make some garden sculptures using this technique. Thank you for sharing.